Java Expert....Java/Open Source Addict

Redes Sociales

twitterlinkedinrss feedemail youtube

miércoles, 2 de enero de 2019

Encoding JSP


Hello friends, in this opportunity I will show how to change the JSP encoding. For this we need the following:

1. Select the option Windows --> Preferences o Eclipse --> Preferences depending windows or mac respectively.


2. Change the Encoding, apply and close.

lunes, 26 de noviembre de 2018

Install Docker on Centos 7


Hello friends, in this opportunity I am going to review how to install the Docker on Centos 7. For this we need to do the following:

1.- First, we need to install the followings dependencies: yum-utils, device-mapper-persistent-data and lvm2. In my case I have installed.


2. Next we need to add the docker repository.


3.- Then, we need to install docker using the yum install docker-ce command.


During the installation process, we need to accepted  the information key.

4.- Finally, when the installation has finished. We need start up the docker service executing the systemctl start docker command and verify it through the docker run hello-world command.


lunes, 5 de noviembre de 2018

Install NodeJS on Centos 7


Hello friends, in this post I am going to show how to install NodeJS on Centos 7. For do this, we need to do the following.

1.- First go to the Node download page and download it.


2.- Next uncompress the package on directory you like.

3.- Then, configures the NODE_HOME environment variable. In my case I will configure on the root account in the /etc/profile file. For this we need to log as like root user.


4. After that, you must to update the environment variables executing the source /etc/profile command in both root and user account o also we can reboot the machine.


5.- Finally, we need to test the node version with the node -v command.


martes, 30 de octubre de 2018

Install GIT on Centos 7


Hello friends, in this post I'm going to show how to install GIT on Linux, specifically Centos 7. For this we need to do the following

1.- Firts go to the GIT page and download it. 


2.- In the Centos case, we need to install git using the yum install git command. Don't forget execute the command as root user.


3.- Once installed, we need to configure the user and email address. This information is known like as Identity Information. It will be used in every commit. For this we need to execute the following commands.


4.- After that to check the configuration. We need to execute the git config --list command.


 5.- Finally as optional, we could add the git.exe to PATH.

miércoles, 24 de octubre de 2018

Install OpenJDK on MAC Computer


Hello friends, in this post I'm going to show how install the OpenJDK on Mac computer using Homebrew Package Manager . This way is very simple, for this we need to do the following:

1.- First install homebrew package manager, the indications how to do this is here.
2.- Next open a console o terminal and execute the brew tap homebrew/cask-versions command to update versions.


3.- Next execute the brew cask install adoptopenjdk8 command to install the openJDK.


4.- After that we must configure the JAVA_HOME environment variable in the .bash_profile file with the value  /Library/Java/JavaVirtualMachines/adoptopenjdk-8.jdk/ and export it.


Don't forget re-open the terminal to update the .bash_profile file.


5.- Finally verify the java version with the java -version command.


viernes, 19 de octubre de 2018

Change Password Postgres.app on Mac


Before I show us how to change the password on Postgres is important say us that I used the Postgres.app  program to install Postgres on Mac. It is a tool  that let us manages the database from easy way. However the default installation doesn't include password.


To change the password  we must do the following steps:
  1. Go to the /Applications/Postgres.app/Contents/Versions/10/bin directory and execute the ./psql --u postgres command.
  2. Next we need to change the password throught the \password command. We need to enter the password twice times.
  3. Next quit the postgres console.

4. After that we need to change the autentication method of trust to md5 in the pg_hba.conf  file  located in /Users//Library/Application Support/Postgres/var-10/pg_hba.conf, where is the username of computer.


       5. Finally we need to restart the Postgres.app, for this we must stop the database and start again.


Configuración EclipseLink en WildFly


Estimad@s amig@s,

En el caso de que se requiera trabajar con la capa de persistencia EclipseLink en el servidor de aplicación WildFly (que viene configurado por defecto con Hibernate) se necesita realizar los siguientes pasos:

1.- Descargarse la capa de persistencia eclipselink 2.7, proceder a descomprimirle.


Nota: No utilizar la versión 3.0 o superior tiene un bug para encontrar la clase que representa el proveedor de persistencia.

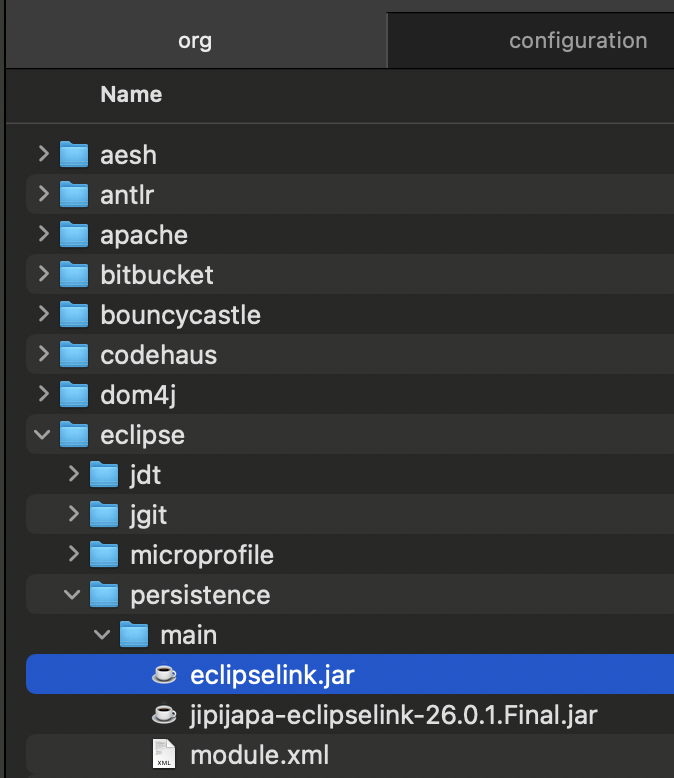
2.- Proceder a copiar el archivo eclipselink.jar ubicado en el directorio jlib del archivo descargado al directorio <WILDFLY_DIR>/modules/system/layers/base/org/eclipse/persistence/main


3.- Proceder a editar el archivo module.xml referenciando al nombre de la librería (jar descargado) y excluyendo las clases del path javax que vienen precargadas en el servidor como se muestra a continuación.


 4. Finalmente reiniciar el servidor y estaremos listos para trabajar en nuestro servidor de aplicación con la capa de persistencia eclipselink.

Nota: En el caso de estén utilizando una versión anterior a WildFly 10. se deberá incluir la propiedad eclipselink.archive.factory  para poder ubicar las clases de JPA, en el archivo standalone.xml luego de extensions  como se muestra a continuación.